
Designing a New Application
A Comprehensive Playbook
Navigating the nebulous waters of digital transformation, company leaders often find themselves at the intersection of innovation and uncertainty. The stakes are high, and quality product design is indispensable. Introducing a new application to the market is more than just a business decision; it’s a bold statement about the company's direction, ethos, and vision for the future. Amidst this maelstrom of aspirations, constraints, and competition, where do leaders begin? How do they ensure that this leap into the digital arena isn’t just technologically advanced but also user-centric, scalable, and aesthetically alluring?

Enter FullStack Labs
Recognizing the unique challenges leaders face, we have devised an product design approach tailored to address a spectrum of needs:

Early Stage
For the pioneers at the very early stage, looking to spark investor interest without exhausting resources. We offer rapid prototyping, providing a tangible glimpse of your vision.
Plans In Place
For the visionaries with a firmed-up idea and budget, keen on a holistic design journey before development, we become your beacon, illuminating the path from conception to realization.
Iterative Approach
For the visionaries with a firmed-up idea and budget, keen on a holistic design journey before development, we become your beacon, illuminating the path from conception to realization.
Step 1
Kickoff & Discovery
The foundation phase, where mutual understanding is created, we gather, align, and strategize. Our goal is to take the client's vision and prepare it for the transformative journey ahead.
Objective
Establish a solid understanding of the intended application, client aspirations, and potential challenges, and devise an actionable plan to bring this vision to life.
Activities
Knowledge Transfer
We dedicate time to familiarizing ourselves with the existing data, prior research, and any other foundational material the client provides. It's essential for us to understand the terrain before embarking on the journey.
Stakeholder Interviews
Engaging one-on-one with key stakeholders provides in-depth insights into their aspirations, concerns, and the strategic intent behind the application. This qualitative input is invaluable in crafting an app that aligns with the company’s larger objectives.
Define Goals & Objectives
We’ll identify key technical performance indicators and business-centric metrics such as user acquisition, conversion, and revenue potential.
Scope Definition
This is about setting clear boundaries: What features are essential for the MVP (Minimum Viable Product)? Which ones can be scheduled for later phases? By defining the scope, we ensure that the project remains focused and feasible.
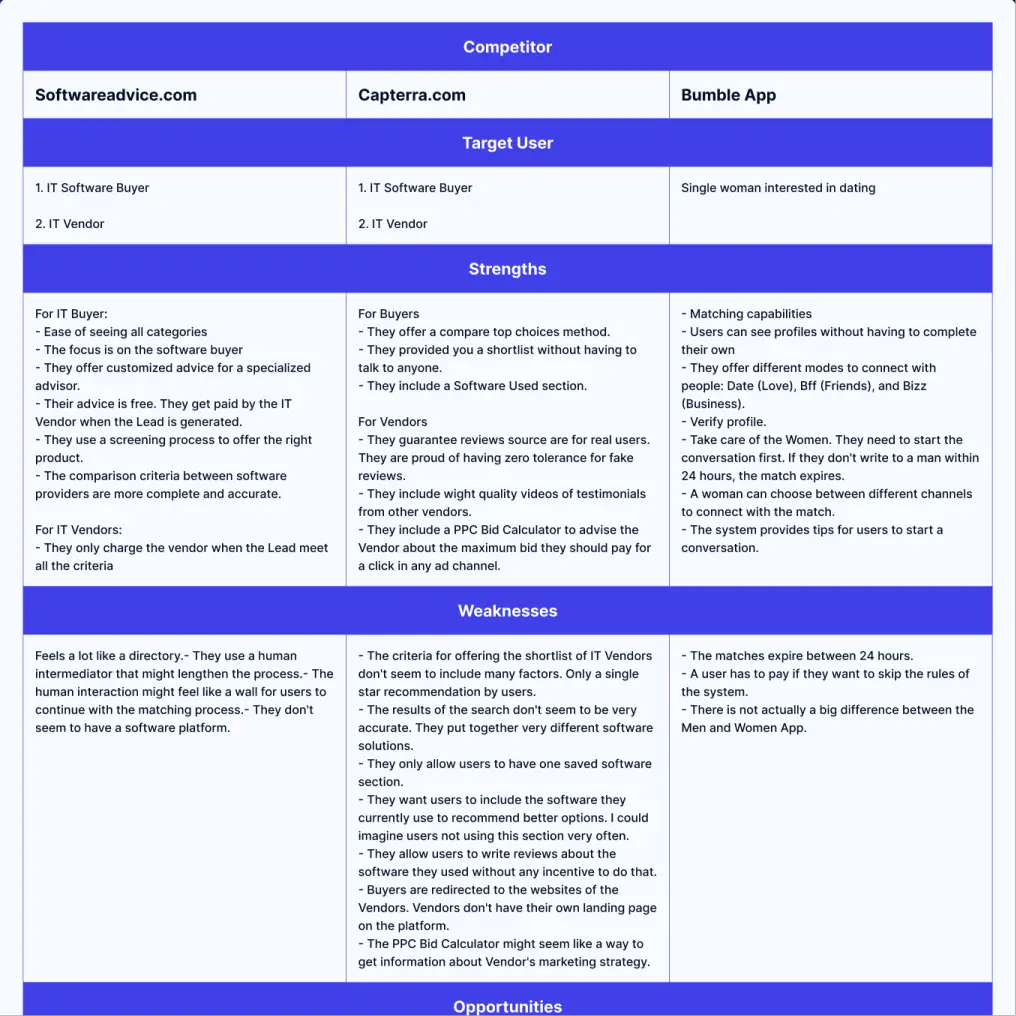

Competitive Benchmarking
We analyze the market to identify direct and indirect competitors, assessing their strengths, vulnerabilities, and unique selling points to gain insights that position the application uniquely in the market landscape.
Key Deliverables
Evidence of our new knowledge and a clear path forward for the next phase.


Step 2
User Experience Design
As the core of user-centric design, this phase dives into the mind of the end-user, weaving a seamless journey that marries utility with delight.
Objective
We aim to craft an intuitive and engaging user experience (UX), merging client aspirations with actual user needs. It's not just about building an app, but ensuring users value, enjoy, and advocate for it.
Activities

User Research & Personas
Through focused surveys, in-depth interviews, and user tests, we uncover real user needs and pain points. Through collaborative sessions, we work to build hypothetical user profiles. These personas, rich in detail, help us understand potential user needs, preferences, and pain points, ensuring the app is designed with real-world users in mind.
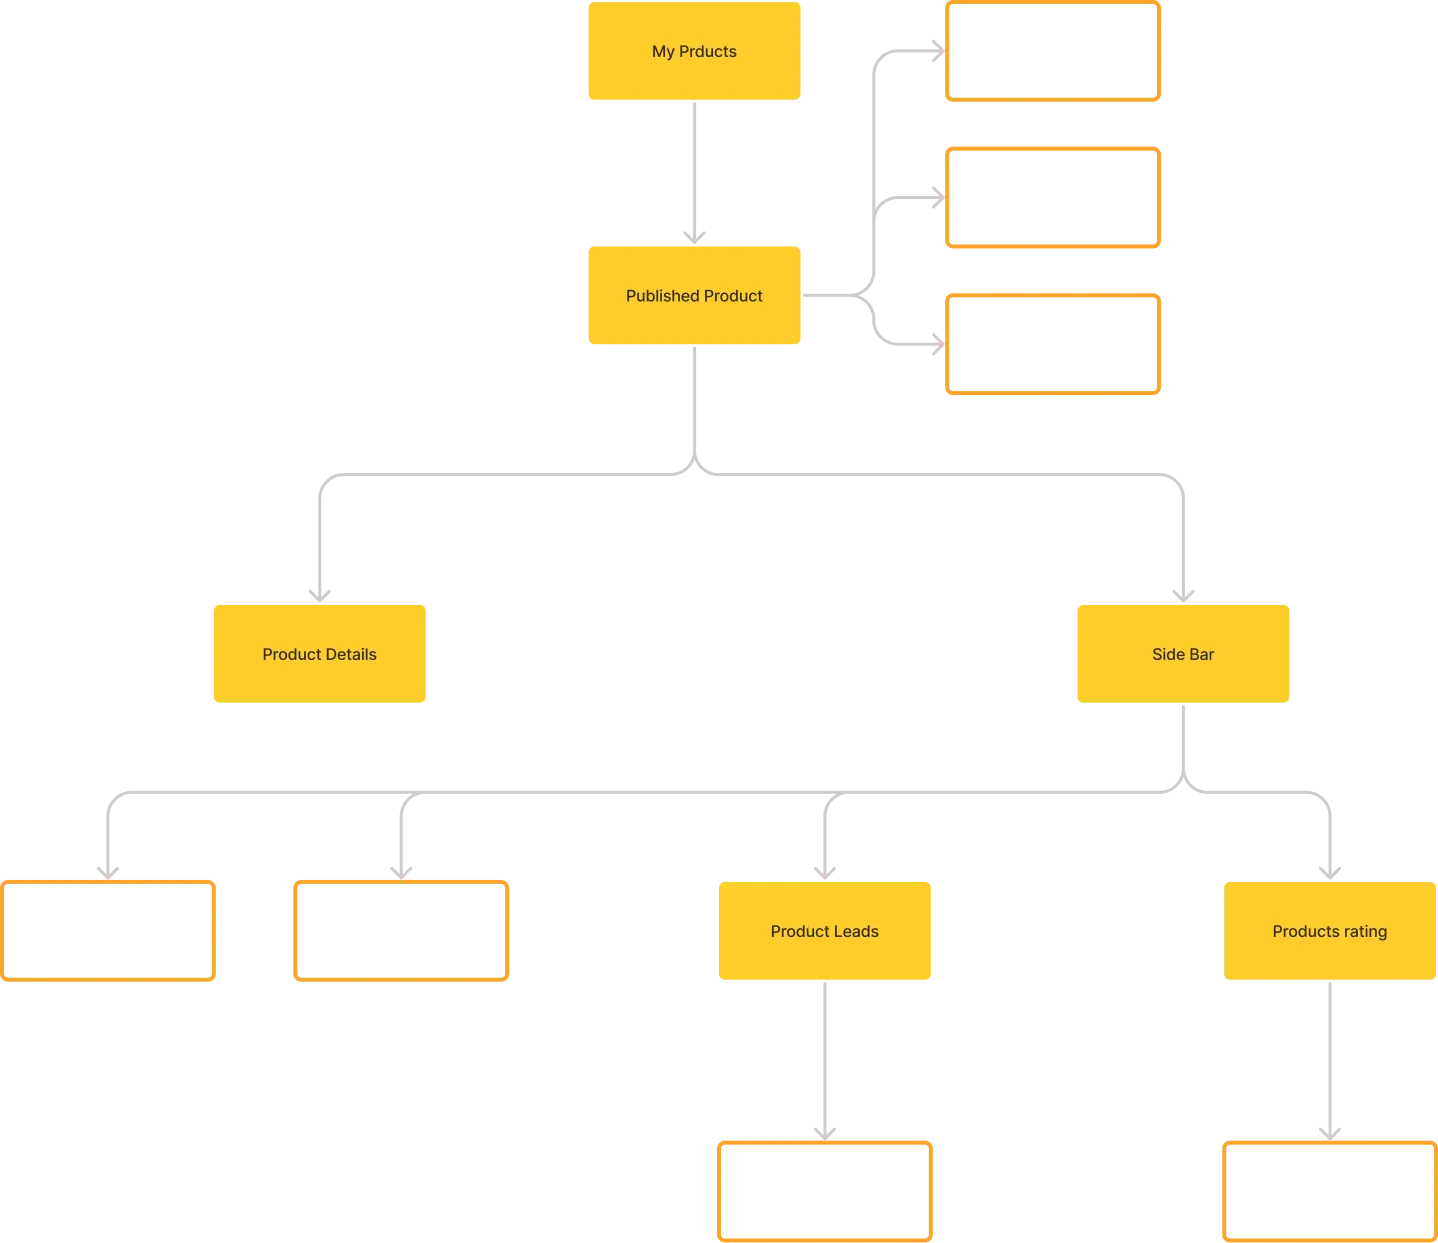
Information Architecture
Think of this as the blueprint of a building. A logical, structured content framework ensures users don't get lost in the digital maze. This also ensures all data has a location in the app to be displayed.
User Flows
We build User Flows to demonstrate the steps users will take to achieve specific goals. User Flows become especially important when dealing with complex conditional workflows. It allows clients, designers, and developers to share a mutual understanding of how features will work and what feature outcomes will be.


Wireframing
Wireframing allows us to create the general layout of the screen without having to decide on the exact text and imagery that will be used in the final designs. It's useful for:
- Rapid Prototyping
- Understanding Functionality
- Demonstrating the User Flow
- Ensuring a Solid Underlying Structure

Usability Testing
Here we take our prototype on a test drive with real users, seeking feedback and insights. By conducting this early on with low-fidelity prototypes, we are able to rapidly iteration on the proposed solution.

Accessibility
Digital inclusivity is our mantra. We ensure the design speaks to everyone, including those with disabilities. Our team follows WCAG AA guidelines (as a baseline) and the designs are set up to reflect them.
Key Deliverables
Detailed documentation about the users and plans for how they will interact with the app.


Step 3
Technical Discovery
Technical discovery is where design meets technology. We ensure your new app's blueprint aligns with a robust, scalable, and agile technology stack and determine the best route forward
Objective
We will conduct a thorough assessment of your product requirements, UX designs, and UI designs to balance priorities and gauge the scope of development. This involves reviewing your needs and selecting the best-fit technology stack for seamless integration and future scalability.
Activities

Tech Stack Research and Recommendations
The front-end and back-end languages, databases, frameworks, libraries, and other critical tools used to build an app are collectively known as the application’s “tech stack.” Choosing the appropriate tools and the right combination of tools directly correlates to an app's performance, scalability, maintainability, and budget.
Our team will review your design and plans to determine the tech stack that best fits your project. This review includes determining what components will work best and leveraging past project experience and best practices to determine which resources, languages, and libraries will create an optimal ecosystem.

Architecture Ideation
Software architecture refers to the overall structure of a software system and the design decisions made to achieve desired qualities such as performance, scalability, and maintainability. It defines a software system's components, modules, interfaces, and data and outlines how they interact.
In this stage, our team will develop a rough understanding of how your redesigned application will function technically. They will work closely with you to analyze user stories and capture your project needs.
Building a strong architecture is crucial to ensuring a robust and scalable foundation that supports the design and prepares the app for future iterations.
Key Deliverables
Assurance that what we are designing is technically feasible.
Step 4
User Interface Design
We move from the skeletal frame of UX to the artistry of User Interface (UI). Here, we breathe life into the wireframes, suffusing them with color, typography, and graphics, ensuring that the digital interface doesn’t just function but captivates.
Objective
Breathe life into our wireframes, transforming them into vibrant, interactive visuals that captivate users. Through a meticulous design process, we ensure the application's aesthetics not only delight but also amplify its functionality and user experience.
Activities

Style Concepts
Style concepts demonstrate different options for the look and feel of your application, including colors, fonts, etc. We generally create two or three style concepts for you to choose from, each with its own unique look and feel. Prior to creating the concepts we review your competitors products and determine how we'll differentiate your product from theirs. We combine these findings with your existing brand guidelines to create the style concepts.
Hi-Fi Mockups
High Fidelity Mockups serve as a visual representation of how the app will look. It incorporates the structure of the Wireframes with the visuals of the Style Guide. The mockups also incorporate visual assets like photography, illustrations, and icons. These serve as an accurate depiction of how the app will look when it launches.


Design System
Construct a cohesive, scalable set of design principles and components. This process ensures consistency across the interactions and visuals of the product. It also increases the velocity of the development efforts.

Responsive Design
Pulling everything together, we craft designs that fluidly adapt to varying screen dimensions. Our designers will build out high-fidelity mockups at each target breakpoint and provide guidance to the developers to do between them.

Key Deliverables
Visually appealing mockups based on a solid foundation.


Step 5
Prototyping
Prototyping is our virtual sandbox. We simulate user journeys, validate our design hypotheses, and iterate. By enabling stakeholders and users to interact with a virtual version of the product, we refine, reassess, and revitalize our designs based on tangible feedback.
Objective
Craft dynamic prototypes to communicate the app's flow and functionality visually, giving stakeholders a tangible experience of the end product. This phase aids in refining design choices and ensures alignment between user needs, business goals, and technical constraints. Prototypes are one key way product design helps developers work efficiently.
Activities
User Journey Prototypes
Create visual paths that showcase how users will navigate and interact within the app. This prototype will demonstrate how the user achieves their goal and may also explore edge cases.

Navigation Design
Develop a coherent and seamless flow, ensuring users find what they're looking for efficiently. In the prototype, users are able to navigate to all views of the app.
Interaction Design
Incorporate subtle animations and cues that enhance user engagement and provide feedback. These micro interactions create a seamless feeling to the app and build a sense of delight.
Error Handling
Demonstrate system responses, ensuring that users are guided gracefully through any hiccups.

A/B Testing
Compare design variations to pinpoint which version fosters better user engagement and conversion.
UAT Testing
Ensure the design meets requirements and offers a glitch-free experience in real-world conditions.
Stakeholder Acceptance
Collaboratively align the design with stakeholder expectations and business goals.
Key Deliverables
Visually appealing mockups based on a solid foundation.


Step 6
Development Prep & Support
As the design crystallizes, we pave the way for its technical realization. This phase involves meticulously documenting our design, elucidating nuances, and ensuring the transition from design to development is seamless, devoid of misinterpretations or oversights.
Objective
Bridge the design and development phases seamlessly, ensuring every design detail is documented—paving the way for developers to translate the design into a functioning app without hitches.
Activities

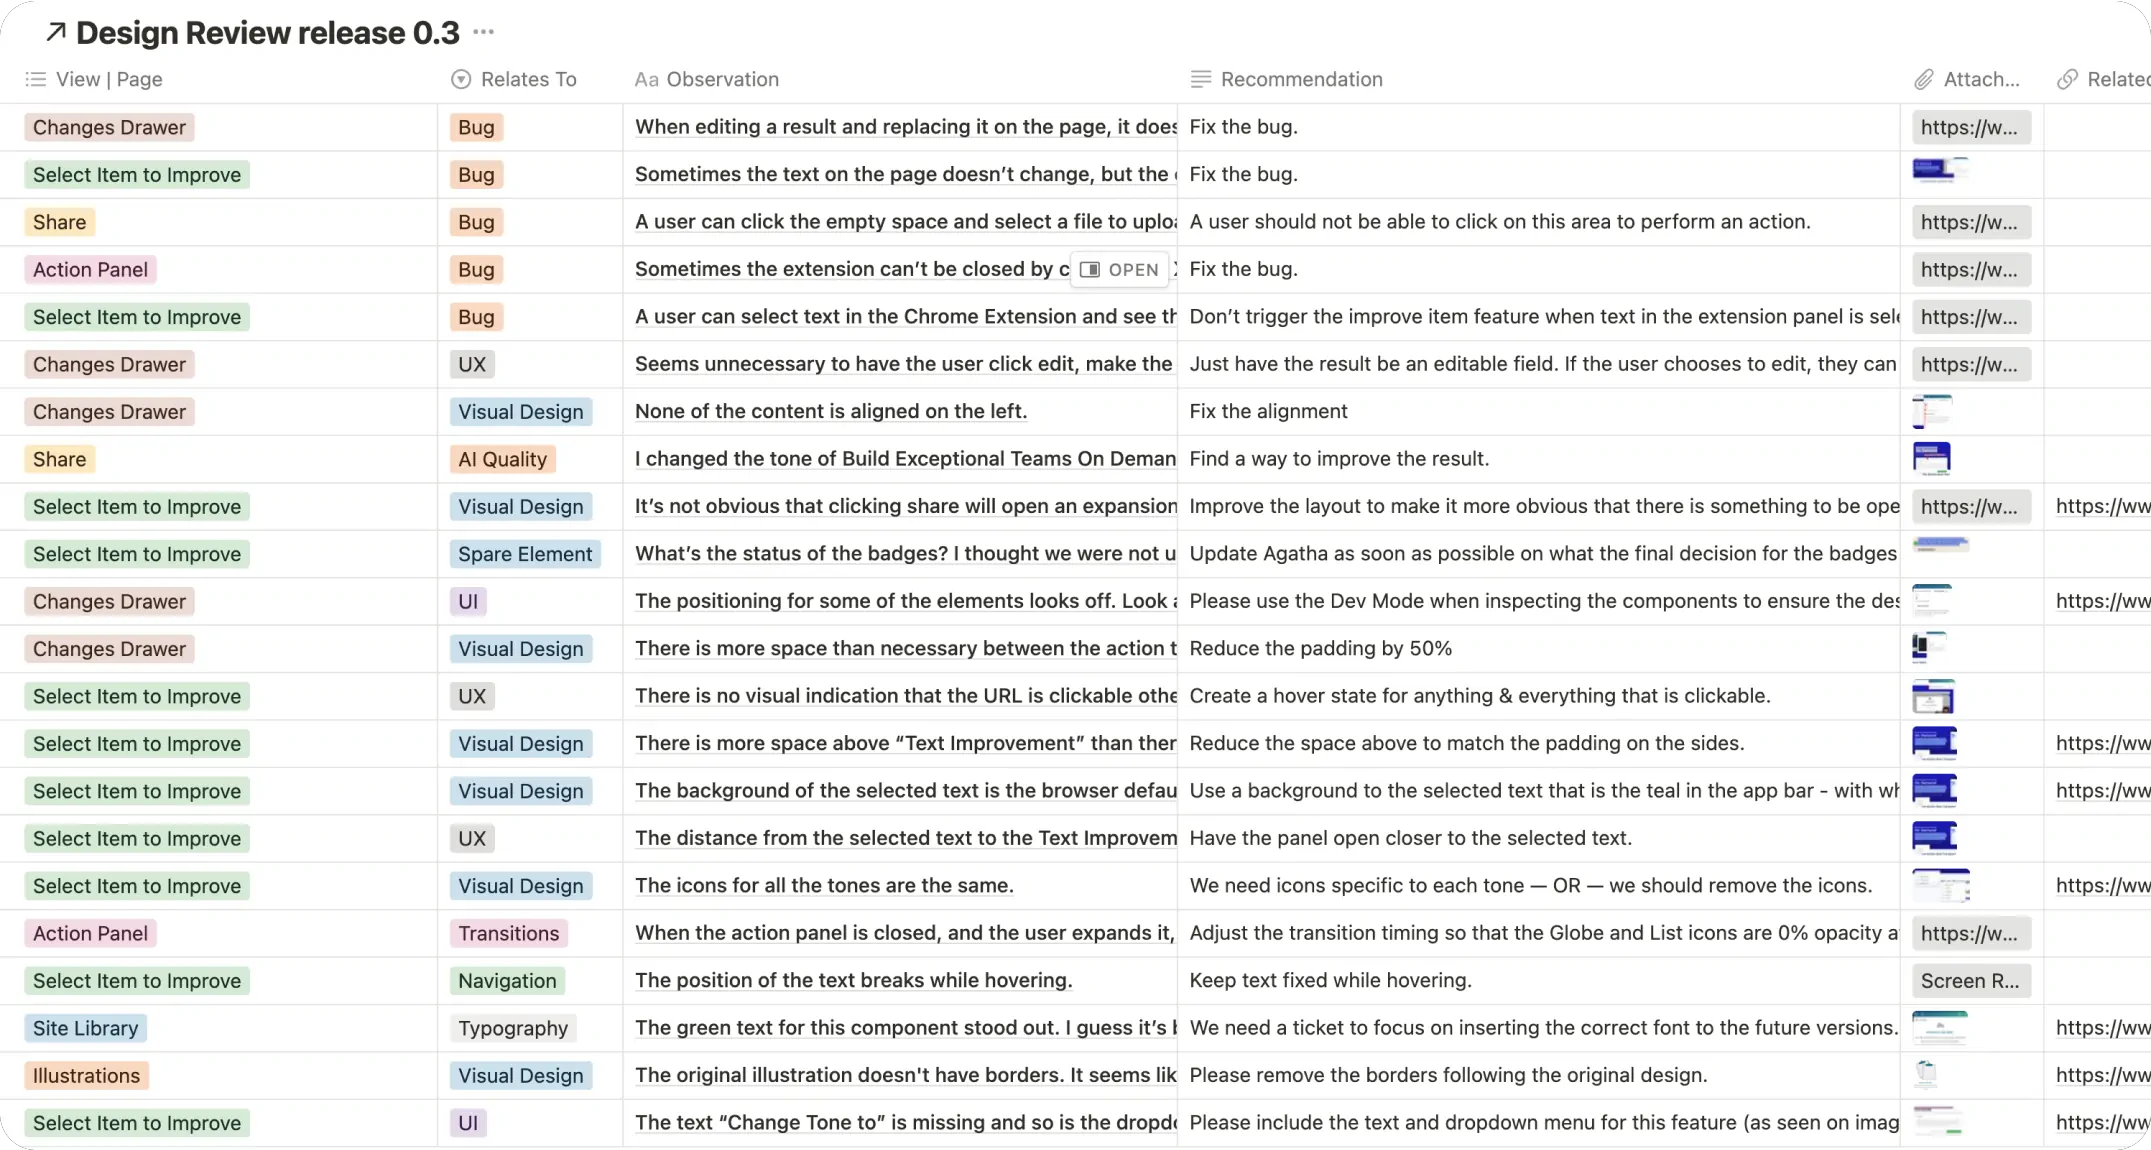
Design Documentation
Create detailed notes capturing every design nuance, ensuring developers have a clear blueprint to follow.
Design Audit Of Development Releases
Continuously assess the app during development, ensuring the actual product aligns flawlessly with the intended design.
Demos for Developers
Develop in-depth video demonstrations that guide developers through the prototype, emphasizing intended behaviors and interactions.

Key Deliverables
Visually appealing mockups based on a solid foundation.


Step 7
Launch & Refinement
This is the moment we've been working towards: launching the app to the market. But our work doesn't stop there; after the launch, we listen to users, gather feedback, and make any necessary refinements to ensure your app remains top-tier.
Objective
Delivery of polished launch across channels, ensuring a stellar user reception. Post-launch, harness user feedback and analytics to fine-tune and elevate the application experience.
Activities
App Store Assets
Design and prepare compelling visual assets that accentuate the app's features, ensuring it stands out in app marketplaces.


Feedback Analysis
Dive deep into user reviews and feedback to pinpoint areas that can be enhanced, ensuring a user-centric evolution of the app.
Refinement
Return to the design phase with fresh insights from real-world usage, tweaking and enhancing the app to meet evolving user needs and expectations.
Key Deliverables
Visually appealing mockups based on a solid foundation.


Design an app with FullStack Labs
Embarking on an application design journey is an exciting venture, but like any expedition, it requires a trusted guide. FullStack Labs is not just any guide—we pride ourselves on being the paragon of excellence in the ever-evolving landscape of application design. What sets us apart?
Transparent Collaboration
Our clients' unique needs shape our involvement. Some wish to be deeply embedded in every phase, while others favor periodic updates. We'll adapt our processes to meet your preferences.
Full-Service Design Excellence
Our product design team is capable of taking your product idea through our rigorous process and producing a development-ready product design that is sure to delight your users.
Download your Quick Start Guide
Ready to dive in? Complete the form below to download a quick reference guide for this playbook!