

As you may already know, OpenAI's ChatGPT is a state-of-the-art language model capable of generating human-like responses to a wide range of queries. With its cutting-edge technology, ChatGPT has revolutionized the way we interact with AI, making it more natural and intuitive than ever before.
We will start by providing a brief overview of the API so you can understand its key features and capabilities. Then, we will delve into the fun part —fine-tuning the response. With this powerful feature, you can train ChatGPT to generate responses specifically tailored to your needs and requirements. Whether you want to create a chatbot for customer support or a virtual assistant for your personal use, fine-tuning the response is the key to success.
And finally, we will build a simple terminal chat interface so that you can experience the power of ChatGPT first-hand. This step-by-step guide will show you how to create a functional chatbot using just a few lines of code, giving you a glimpse into the endless possibilities of the API.
So, whether you're a seasoned AI developer or just starting out, this blog post is for you! Join us on our journey to explore the world of OpenAI's ChatGPT API and discover how it can help you build the next generation of AI applications.
What the… model?!
OpenAI’s API is fairly straightforward; you select a model you want to work with, ask it to complete text or generate an image, and get charged depending on the number of tokens it needs to process. Let’s try to unpack what this all means; a model is a series of algorithms that can interpret data and produce a result based on that data. In the case of this blog post, we are going to be looking at text-completion models such as the ones in GPT-3. These models are fantastic at analyzing natural language, intent, cause and effect, sentiment, and classification.
OpenAI’s API offers access to 4 different models with different abilities and speeds:
- Davinci: Good at complex intent, cause, and effect, and summarization for an audience.
- Curie: Language translation, complex classification, text sentiment, and summarization.
- Babbage: Moderate classification and semantic search classification.
- Ada: Parsing text, simple classification, address correction, and keywords.
It’s worth noting that Davinci is the slowest yet most powerful, while Ada is the fastest and cheapest one.
Now, talking about tokens, in a nutshell, each model works by breaking down the text into groups in a process known as tokenization. Each model has a max amount of tokens it can process, and they are affected by both the prompt you give and the completion the model produce, so for instance if Davinci can handle 4.000 tokens, and you use 3.000 for your prompt, it will only be able to produce at most 1.000 tokens for the output. Tokenizing is a pretty big deal for pricing as well, each model has a cost associated with the number of tokens it has to process, and this is also true for things like fine-tuning operations.
Speaking of fine-tuning, the API allows you to upload training data to customize your model’s response. This will, in turn, get you higher-quality results, lower latency, and in general, better performance. To fine-tune your model, you’ll need to prepare your data; OpenAI expects a JSONL document with both prompt and completion per row. It has a handy tool to convert a JSON or CSV document into JSONL—we will take a look at it later. Once you have your training data ready, you upload it and queue it for training, and then you can use your new model.
A chat example
Let’s have some fun now. I scrapped the script for 2001: A Space Odyssey to train our model to reply as HAL would. OpenAI suggests ~100 examples for training which is a bit more than the original script has, but it will do for our purposes. I separated the data into prompts for the things that the crew said to HAL and completion for HAL’s reply. You can take a look at the raw data here.
Once you have the raw data, we can convert it to JSONL via the OpenAI CLI tool. Make sure you have Python 3 installed, and then:
pip install --upgrade openaiYou will also need to install the datalib
pip install 'openai[datalib]'And include your OpenAI key on your shell’s initialization script (.bashrc, .zhsrc, etc.). You can get the key in your dashboard under API keys.
export OPENAI_API_KEY="<OPENAI_API_KEY>"Once you have the CLI tool setup, you can prepare your data via
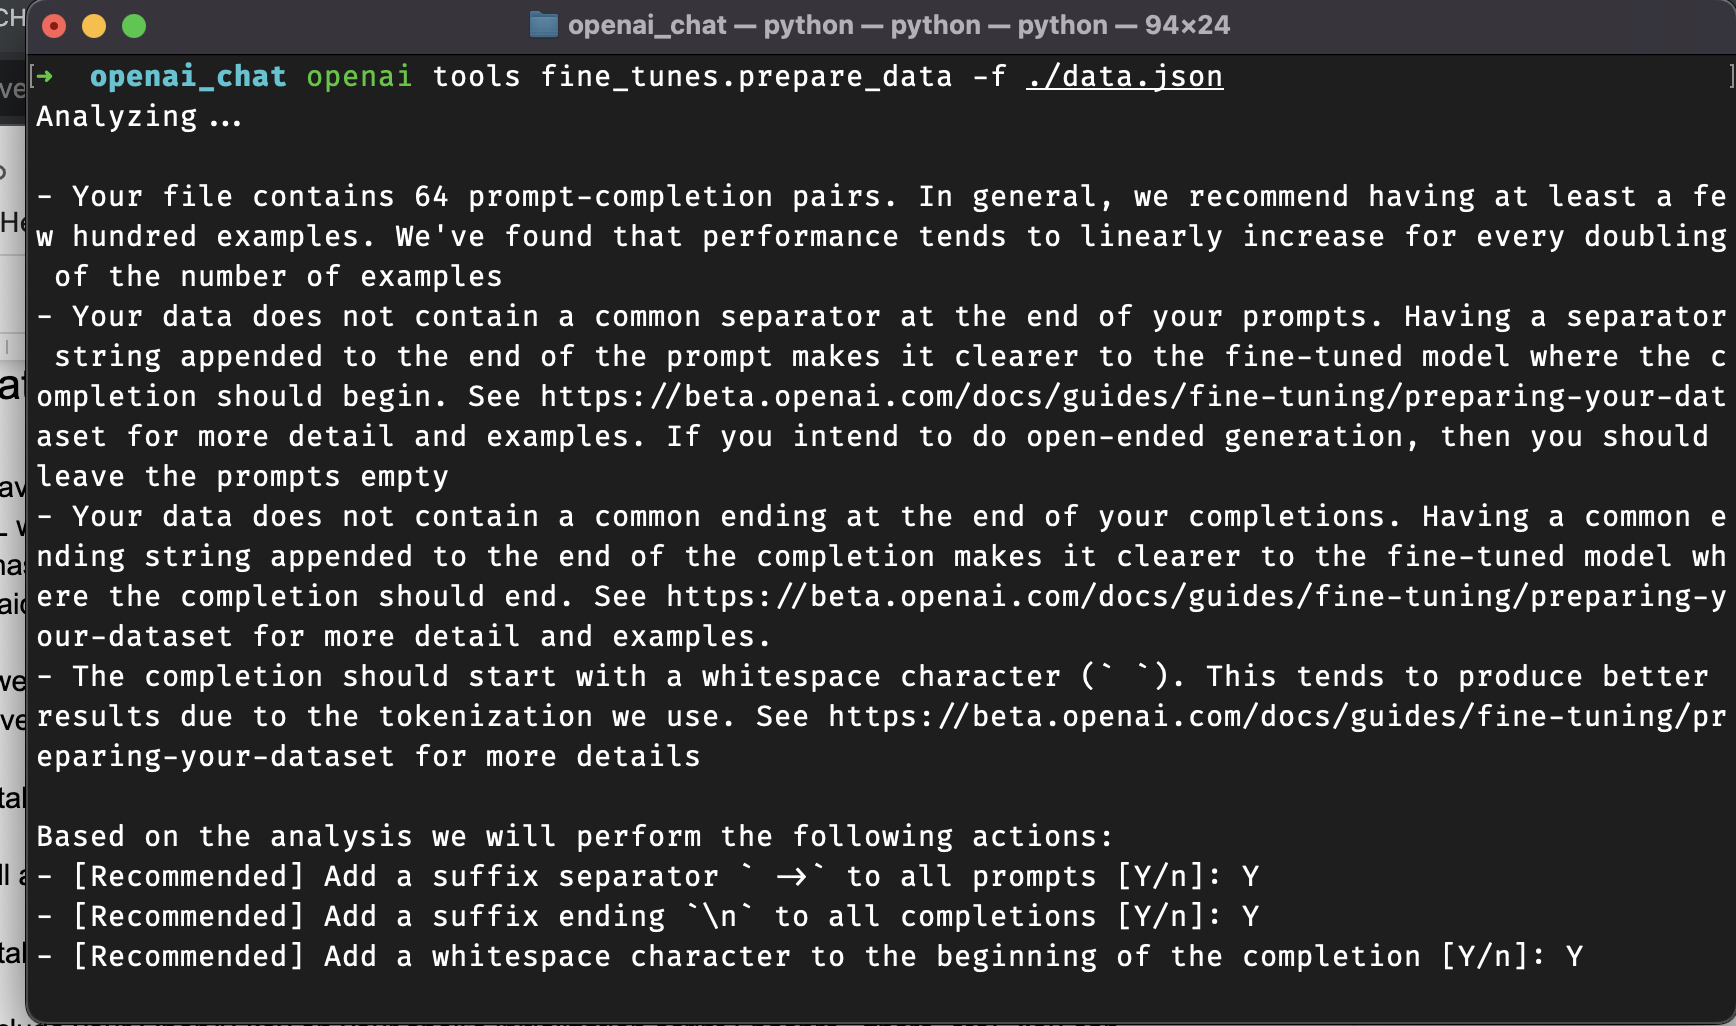
openai tools fine_tunes.prepare_data -f ./data.jsonThis will guide you through the process, help you format the training data into the required structure, and produce a JSONL ready to be uploaded.
Ok, so once you have the training data ready, we will start by creating a script to upload and create fine-tune. I created a barebones node project, and we’ll start by installing the OpenAI SDK:
npm install openaiThen we need a upload_finetune.mjs file to contain our script; we’ll start by importing our dependencies:
import { Configuration, OpenAIApi } from "openai";
import fs from 'fs'


const configuration = new Configuration({
 apiKey: process.env.OPENAI_API_KEY,
});
const openai = new OpenAIApi(configuration);
You can see that we are reading the API key from the environment; since we set it up as part of the init script of the shell, we should be good. Now, let’s upload our training data; I renamed the file hal_script.jsonl, and we will hit OpenAI’s File API. Since our data is for fine-tuning, we’ll label it as ‘fine-tune’; this will, in turn, make the API perform a series of checks and validations to make sure the data is constructed correctly.
const uploadFileResponse = await openai.createFile(
 fs.createReadStream("hal_script.jsonl"),
 "fine-tune"
);
Then, we just need to call the fine-tune API to train our model; we will need to point to the uploaded file id and specify which model we want to tune —in this case, it’s Davinci, and add a suffix to the fine-tuning so we can differentiate between all of our training data.
const fineTuneUpload = await openai.createFineTune({
 training_file: uploadFileResponse.data.id,
 model: 'davinci',
 suffix: 'hal'
});
And that’s it; you can see the complete script here. When you run it, the API will get your data and queue the training, it takes a few minutes for it to process, but once it’s done, you’ll get a fine-tuned model to play around with.
We can now have a pause for coffee while the model is training.
Okay, our model is finally trained, and we are good to go, so let’s start by installing a nice tool to help us manage the chat in the terminal.
npm i readline-syncThe package readline-sync will deal with reading the prompt from the terminal and making sure things work as expected. Now, let’s create our index.mjs file and import the packages.
import { Configuration, OpenAIApi } from "openai";
import readlineSync from 'readline-sync';


const configuration = new Configuration({
 apiKey: process.env.OPENAI_API_KEY,
});
const openai = new OpenAIApi(configuration);


const response = await openai.listFineTunes();
Nothing too weird here; just making sure we import and initialize the SDK, and then we query the API to get all fine tunes. Now we are going to do some magic and have our chat in 20 lines.
while (true) {
 const input = readlineSync.prompt();
 if (input === 'bye') {
   console.log('Bye!')
   break;
 }
 try {
   const chatResponse = await openai.createCompletion({
     model: response.data.data[0].fine_tuned_model,
     prompt: input,
     max_tokens: 16,
     temperature: 0.2,
   });
   console.log('HAL: ', chatResponse.data.choices[0].text.replaceAll('\n', '').trim())
 } catch {
   console.log('Something went wrong!')
   break;
 }
}
And voilà, a chat with your favorite AI. Okay, let’s unpack this. First, we have a while loop to keep reading lines from the terminal and prevent the program from finishing, but it gets far more interesting.
 const input = readlineSync.prompt();
 if (input === 'bye') {
   console.log('Bye!')
   break;
 }
While it’s running, we’ll wait for a user prompt; whatever the user types until they hit enter will be caught and provided as the input. If the user types bye we will understand this is the end of the session and stop the loop, finishing the program.
try {
   const chatResponse = await openai.createCompletion({
     model: response.data.data[0].fine_tuned_model,
     prompt: input,
     max_tokens: 16,
     temperature: 0.2,
   });
   console.log('HAL: ', chatResponse.data.choices[0].text.replaceAll('\n', '').trim())
 } catch {
   console.log('Something went wrong!')
   break;
 }
Now that we have our input, we can use that as the prompt for our chat. We will call the Open AI Completion API and create a new completion. We get the fine-tuned model from the Fine Tune API. In this case, we assume it’s the first one on the list, but if you have more, you can find it using the suffix we provided while creating the new model.
Then we provide the prompt, and two more arguments, max_tokens, to help you limit the number of tokens used in the completion response, and temperature, to determine how deterministic the completion will be. None of the models are fully deterministic, but this helps tune the variance between responses. Finally, if something goes wrong with the request, we let the user know and finish the program.
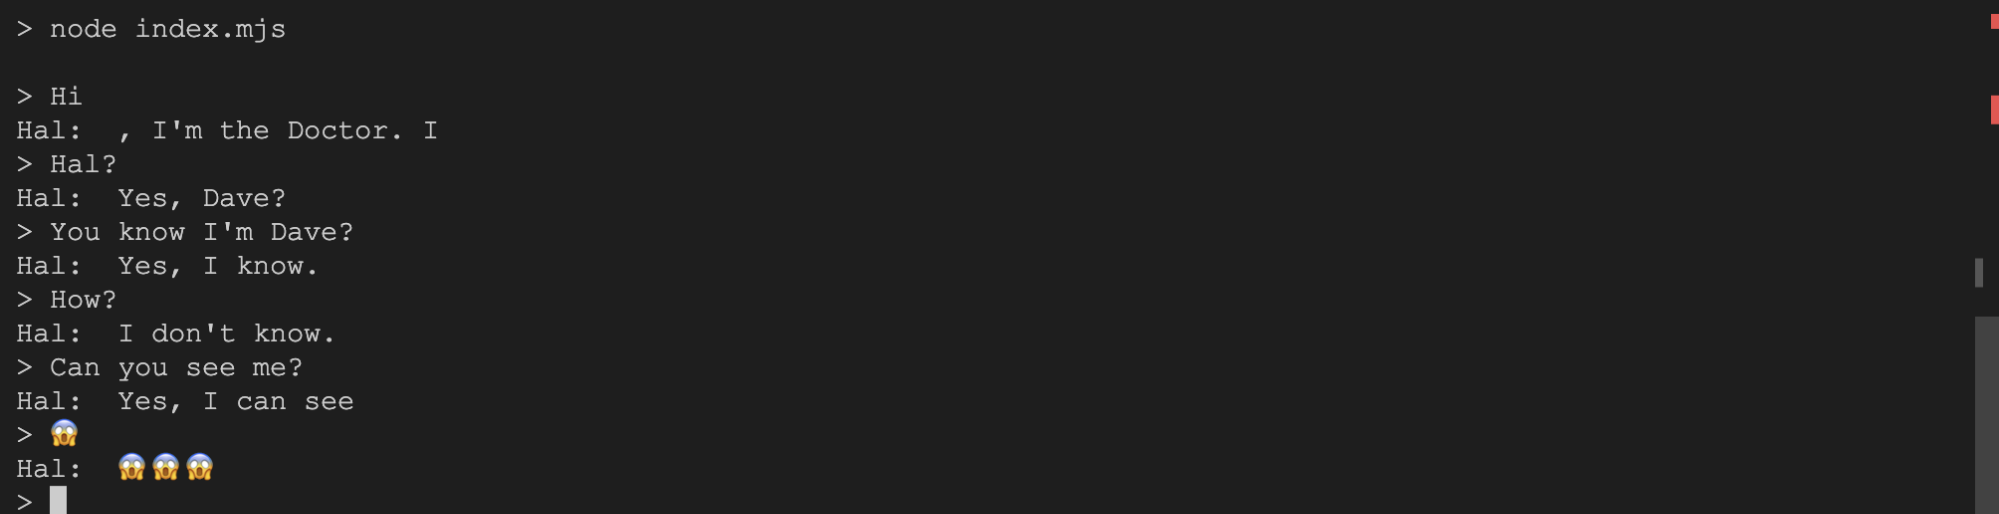
🎉 🎉 🎉 Success! We have a chat with our AI friend. Let’s just make sure we don’t get stuck with it in a space station. As always, if you want to check out the complete code, you can access it here.
Summary
This post gave us a glimpse of the power OpenAI provides for us. We reviewed the GPT-3 models, fine-tuned one to answer like HAL 9000, and created a simple chatbot experience in our terminal. But there is so much more to do; various models complete things in a different way. I highly recommend testing the “text-davinci-003" model; it doesn’t require fine-tuning, and it’s the latest and greatest at the time of this writing. The API also supports edits, streaming responses, image generation, and code completion. Overall, it’s a pretty exciting moment to be in this space, and I’m thrilled to see how the tech evolves in the coming years.