

An introduction to recommendation systems
Recommendation systems are everywhere, from the videos that you watch on Youtube to your latest purchase on Amazon. All of those services use a system to create a profile about the user’s preferences based on historical data. If you like to watch a lot of action movies on Netflix or any streaming platform, it’s more likely that the platform will suggest some other action movies for your next movie night.
All the recommendation systems attempt to classify the items in a sort of rank list, which is different for each user. This way, the platform adapts its content to the likes or dislikes of the customer. The main goal is to keep users engaged with the platform.
Cold start problem
This term comes from the fact that some cars need an optimal operating temperature for their engines to operate, especially in cold conditions. So, for recommendation systems, the cold start problem is the fact that, for a new item or user, it’s difficult to determine accurately the best possible recommendation. Suppose we have a movie app. If we need to implement a recommendation for a new movie, we don’t have enough information about the user preferences for this movie. In particular, the same happens with a new user.
Types of recommendation systems
Content based
This kind of recommendation system basically checks the similarity between two items. Let’s say that the user is watching a movie. This algorithm checks if there are other movies with the same features (genre, release year, MPA rating, etc). Now, how do we measure the feature similarity? There are some approaches to calculating that. Let’s check it with a sample.
Suppose a user is watching Die Hard. Then, a recommendation system established on content-based will try to search a distance between the available movies. This should be calculated with the following approach:
Euclidean Distance

The Euclidean Distance tries to search in a three-dimensional space for the similarities between two items based on their features. In this sample, the movie Rambo III is more similar to Die Hard than Ghostbusters. As minor as the distance is, the items should be more similar.
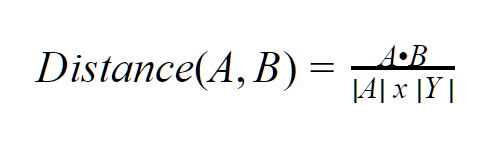
Cosine Similarity
The Cosine Similarity converts all the features of the items into vectors. The complexity of the vectors could be increased as we increase the number of features (dimensions). As minor as the vector distance is, the bigger are the similarities between the items.
Collaborative Filtering
Content-based recommendation systems are usually established on a single user's preference information, but collaborative filtering takes into account the preferences of several similar users; the algorithm tries to analyze the previous users’ preferences and also measure the distance between them. To get a better understanding, here is an example. Let’s say there are some users that have preferences for certain movies:
The goal here is to try to catalog each user to a certain profile. There are several ways to do that. One could be the Euclidean Distance, and the other is the Cosine Similarity, which is content-based. Analyzing this sample, we can group users into two: 1. Action fans (Marcos and Jonas) and 2. Sci-Fi/Comedy fans (John and Peter).
There are some limitations with collaborative filtering:
- Like content-based, we need enough users' preferences recorded to make a match and try to categorize a user.
- In the real world, it’s very difficult to have a matrix with all the ratings filled out for each user. If we have most of the cells with empty values, this matrix is called a sparse matrix. The collaborative filtering problem becomes more challenging as the matrix has a more sparse level.
- What happens if a new user arrives on the platform? In collaborative filtering, we also have to deal with the cold-start problem.
Popularity Based
This type of recommendation system checks the item that has more popularity to mark as a candidate to recommend to a user. The popularity could be measured by the number of mentions or trends according to an external system like Social Media or could be calculated, for example, we can use a weighted rating according to the following formula:

This formula should be applied to all the items on our platform. We can adopt the percentile value that will serve as our cutoff. For example, we can choose that all the movies with a rating above 90% should be included on the trending list.
There are several advantages to using this recommendation algorithm. One is that it doesn't suffer from the cold start problem, and we can apply it even for new users. But the main disadvantage is the recommendation does not have a personalization feature with the movie platform's examples. Then, it will show the same recommendation for all the users regardless of their personal preferences.
Despite that disadvantage, some applications use the popularity base algorithm at the beginning. So, after the platform has enough information, the suggestions’ approach could change its recommendation system to a collaborative or content-based filtering system.
Classification model
This recommendation system leverages a machine learning classification algorithm in order to predict according to the user and item features along with the user's history. Typically, this kind of system leverages Neural Networks or Deep Learning algorithms to get insights into the user's behavior.
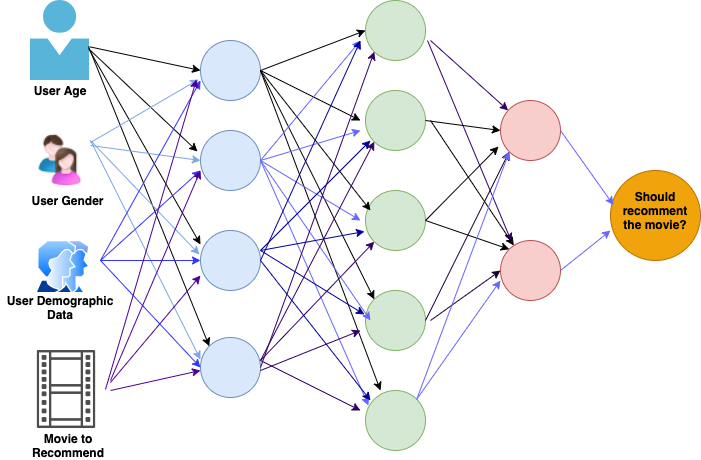
According to information about the user along with each movie on the recommendation, we can build a neural network that tells us if this movie is feasible to suggest for that particular user.
Amazon Personalize and Overview
Amazon Personalize is a cloud-based and fully managed recommendation service that we can use to train and deploy custom recommendation systems for a wide range of industries, like entertainment, logistics, retail, sales, etc.
The base working unit is called a recipe. This is a combination of hyperparameters along with a learning algorithm. The learning algorithm could be collaborative filtering, content-based, or a combination of both.
Independently of the recipe type, we choose Amazon Personalize, which requires the following information to build up a recommendation system:
- Items: Could include a list of movies, products, music songs, and so on.
- Users: A list of users; at the very least, this list should include the user's unique ID as well as other information.
- Interactions: The interactions between the users and the items.
For Amazon Personalize, items and users contain metadata. This information could be used for some recipes. Depending on the recipe, this metadata could be more useful or not. The metadata could include information related to demographics, in the case of users, products, or item behavior, in the case of items.
The interactions represent all the operations that users have performed on the data. For example, one could click on a specific product, watch history for a specific movie, listen to a media resource, time spent reviewing the plot of a movie, or even the amount of time that the user hovered his mouse over a specific item.
Hands-on Building a Movie Recommendation system on AWS Personalize
For the purpose of this hands-on, we are going to use a small version of the complete MovieLens dataset. This dataset contains movie ratings recorded by different users. Those ratings go from 1 to 5.
You can download all the code from Fullstack Labs' Github repository. The Hands-on is built on a Python script with the Boto3 library to interact with AWS.
For the sake of the sample, we are going to use only the interactions dataset, although with AWS Personalize we could use the users and movies dataset for extending our recommendation system with other parameters.
The following diagram shows the overall process that we use to build up a recommendation system with the MovieLens dataset:
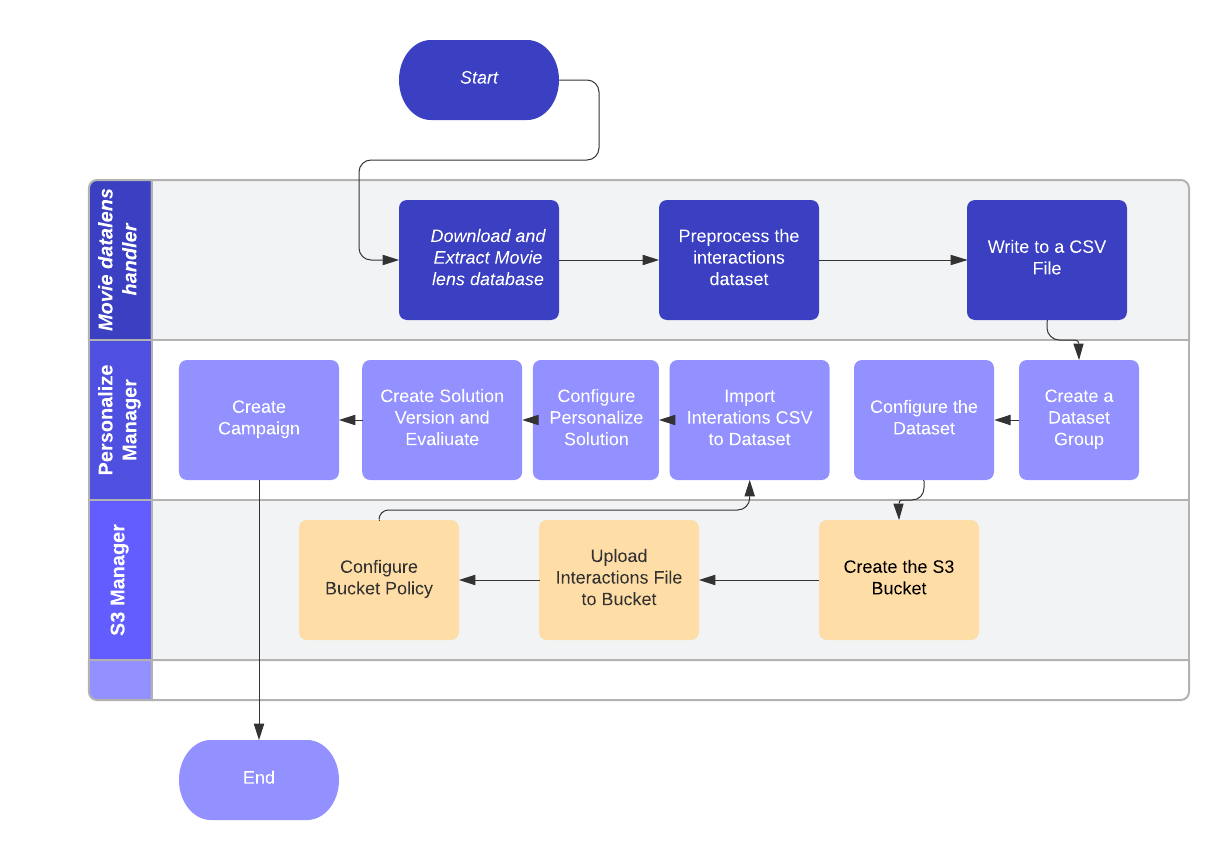
Let’s break those steps down and try to understand each of them.
First, we need to download and extract the MovieLens dataset, so we can be able to operate and prepare the information before setting up the Personalize objects.
So, we are going to leverage Pandas for that step. The final data set that we are trying to build looks like the following table:
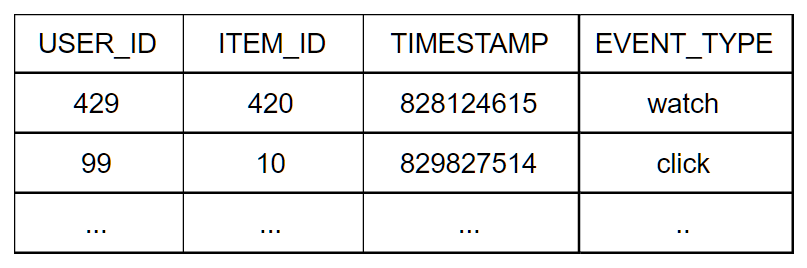
The interactions dataset should have columns that categorize the interactions of the item from the user’s perspective. So, for example, any rating above 3 means that the user probably will watch the movie. Movies rated above 1 mean that the user will probably at least visit the movie description once, and everything below or equal to 1 should be removed from the interactions. That is one interpretation for setting up the interactions dataset, but we could have more with more parameters as well. Here, the rule of thumb is that we need to categorize the interactions between the items we want to recommend (movies) to the specific user.
The following code snippet shows the whole process:
In the end, notice that we have to rename the headers to match the data set definitions that we are going to create after. In the end, we need to write the dataset created in a CSV because it’s the only format that AWS Personalize currently supports.
The next step, after we have the interactions, is to create a dataset group. AWS Personalize wraps all the information for our recommendation system around a group of datasets. We need to configure each of the datasets that we have in that group. It means defining the schema. That schema should be made in an Avro format. For our example, it should be something like:
The next step is to upload to an S3 bucket and configure policies in order to enable AWS Personalize to read the bucket. The policy that allows AWS Personalize to operate over the bucket should have the following structure:
The following import process should get the S3 Object uploaded before and process to the current dataset:
After uploading and configuring the dataset, we need to configure a solution. In order to set up it, we need to follow the steps below:
Choosing a recipe
As mentioned before, the recipe is the algorithm that we are going to use to train our recommendation system. There are three types of recipes: User-Personalization, Personalized-Ranking, and Related-Item. In our sample, we used a User-Personalization recipe because it is optimized for all personalized recommendation scenarios. Each recipe is related to a specific ARN, which in our case should be:
Configure a solution
We need to create a solution and bind it to a specific dataset along with a recipe. To create a solution we only need to use the creation_solution API and send the correct Dataset ARN and Recipe ARN.
Train a model
On the AWS Personalize lingo, training a model means creating a solution version. This step consists of creating a trained machine learning model that serves as a mechanism to predict new outcomes.
Evaluate the solution version
After creating the solution version, we need to check the performance of the trained model. For that, AWS Personalize writes out the solution version evaluation results on the standard output. The following are the relevant metrics that we need to evaluate. The rule of thumb is that as long as the metric is close to 1, it is better:

There is a sample output for the resulting AP solution version creation process:
When we finish evaluating our AP solution version, the last step is to create a campaign. Client applications should get the recommendation through an AP campaign. We can have multiple campaigns related to different train models (solution versions).
An explorationWeight is a value between 0 and 1 and it refers to the ratio of exploration for new items. A 0 value means that there is no exploration and results are ranked according to relevance. You can set this parameter in a range of [0, 1] and its default value is 0.3.
The explorationItemAgeCutOff refers to the number of days that the interactions are relevant for the campaign. For example, a value of 30 means that interactions older than 30 days are discarded.
After creating the campaign, we could invoke it to get recommendation results only with the Campaign ARN and the user ID that we intended to get the information from:
The results for the call above should be something like this (the results might vary depending on the user and the solution training outcome):
Pricing
To calculate the AWS Pricing, we need to break the process down into the following stages:
- Data Ingestion: For the data ingestion process, Amazon only charges per GB of data used that includes the objects stored in the S3 buckets ($ 0.05 per GB).
- Training: When we create a solution version, Amazon charges by the number of hours that we use to actually train the model. AWS uses a 4v CPU and 8 GB of memory as the base computed for the training ($0.24 per training hour).
- Recommendations: When we serve real-time recommendations (as in the previous sample), Amazon will charge by throughput capacity per hour (TPS-hour). We could calculate that as the maximum or minimum provisioned times the total time (in 5-min increments within each hour) and aggregate for the monthly usage.
Example
For the demo above, we have about 5,1 Mb for the interactions file uploaded on S3. The training process takes 30 minutes to complete, and we re-training the model with new data twice a day, consuming 10 training hours/training. The estimation, based on the sample above, is that we could consume around 2 TPS for 720 hours per month to receive the recommendations from the end-user. Based on those numbers, we have:
- Data Ingestion charges: 0,005 GB x $0,05 per GB = $ 0.00025
- Training charge: 0.5 x 2 x 10 training/hours x 30 days x $0.24 per training hour = $ 72
- Recommendation charges: 2 x 720 hours x $0.20 = $288
- Total Cost: $0.00025 + $72 + $288 = $360
That charge could be increased if we need to re-train the model more frequently; that could be possible if we have more users on our final application.
Conclusion
AWS Personalize offers a built-in recommendation mechanism to avoid implementing custom algorithms for providing recommendations on our applications. That tool displays a great variety of customization options regarding the algorithms used to train the model. The consumption of recommendations could be made with the AWS SDK, a Lambda function, or the AWS Command Cli. If you’re interested in a professionally built recommendation system for your app, let’s talk.